How To Cut Chair Rail - 1 : It should be standing on edge with the profile facing away from the fence.. Cut the chair rail end to the specified angle. Place the chair rail molding on a miter saw on the left side of the blade. When autocomplete results are available use up and down arrows to review and enter to select. A chair rail protects the wall from damage caused by the backs of chairs being pushed against the wall. Paint the chair rail and the trim.
Run a strip of carpenter's glue across the back. To get the exact angle, cut two scrap pieces at 46 degrees, then adjust the angle of the cut until the joint is tight (photo 6). Bevel, miter, or make scarf joints as required using the techniques demonstrated earlier. 3 nail the chair rail in place using 6d or 8d nails. The back side of the molding should be shorter than the front.
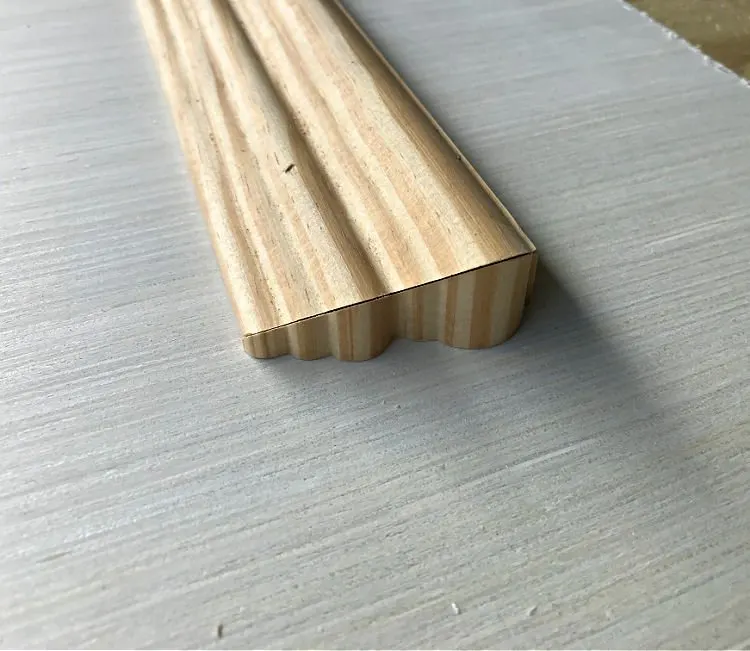
How To Cut An End Cap For Molding Like Chair Rail Abbotts At Home from www.abbottsathome.com When cutting your chair rail, whether using a miter box and hand saw or an automated power miter saw. You will need to take separate measurements for each. Cut the chair rail end to the specified angle. This cuts the caulk and prevents the walls from getting torn up. Use level and tape measure to mark the level on the wall where the chair rail will go. To get the exact angle, cut two scrap pieces at 46 degrees, then adjust the angle of the cut until the joint is tight (photo 6). The addition of chair rail molding is an easy and fairly inexpensive way to dress up a room. Learn a quick and easy way to make your end caps for a chair rail.check out our wall boxes tutorial:
Chair rail isn't just for the dining room anymore!
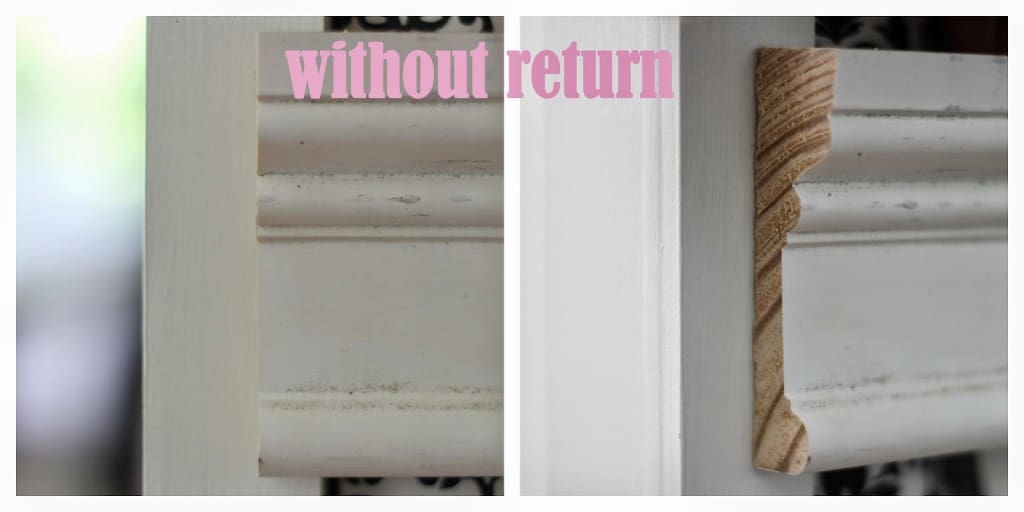
Cut the chair rail end to the specified angle. Insert the edge of the pry bar beneath the wood trim and hit it with a rubber mallet a few times until it goes under the wood more. Use the circular saw to cut the chair rail to size. Set the first piece of chair rail on the saw platform, with the piece standing on its bottom edge (the way it will go on the wall), with the angle making the front of the trim shorter than the back. Cut away the excess wood on the back of the piece of molding, using the coping saw. Saw through the edge of the chair rail. Use a utility knife to score along the edges of the trim. To extend chair moulding corner of wall how to spot quality trim work the how to install a chair rail builders nip tuck 22 1 2 wall returns how to create a chair rail returnhow to create a chair rail return shine your lighthow to create a chair rail return continue reading. Run a strip of carpenter's glue across the back. The addition of chair rail molding is an easy and fairly inexpensive way to dress up a room. Learn a quick and easy way to make your end caps for a chair rail.check out our wall boxes tutorial: Measure the wall according to the length to determine how many lengths of chair rail molding will be needed. This would allow an easier fitting later on.
Bevel, miter, or make scarf joints as required using the techniques demonstrated earlier. The back side of the molding should be shorter than the front. The 45 degree cut on the return will abut the chair rail, and the 90 degree cut will sit flush with the wall (or in this case, the side of my bookcase. Removing the chair rails from the walls. The addition of chair rail molding is an easy and fairly inexpensive way to dress up a room.
How To Create A Chair Rail Return Shine Your Light from www.shineyourlightblog.com Use level and tape measure to mark the level on the wall where the chair rail will go. You will need to take separate measurements for each. Use a utility knife to score along the edges of the trim. It should be standing on edge with the profile facing away from the fence. Cut away the excess wood on the back of the piece of molding, using the coping saw. The inside corner cuts on your chair rail must be made different than the outside corner cuts. Now that you have your measurement, it's time to proceed to the next and trickiest step: Use a stud finder and mark off where the studs are so you know where to nail in the trim.
Use the circular saw to cut the chair rail to size.
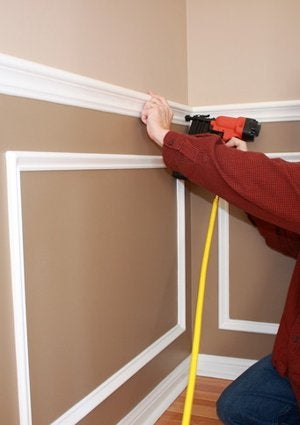
Cut the chair rail end to the specified angle. Watch as the #verycoolguys of construction show you how to install chair rail, in a proper molding installation.today we show you, step by step, how to insta. Have your project done by a local, qualified professional. 3 nail the chair rail in place using 6d or 8d nails. Set the first piece of chair rail on the saw platform, with the piece standing on its bottom edge (the way it will go on the wall), with the angle making the front of the trim shorter than the back. Place the chair rail molding on a miter saw on the left side of the blade. Learn a quick and easy way to make your end caps for a chair rail.check out our wall boxes tutorial: To get the exact angle, cut two scrap pieces at 46 degrees, then adjust the angle of the cut until the joint is tight (photo 6). Cut away the excess wood on the back of the piece of molding, using the coping saw. In cutting the molding, try to cut the smaller pieces first. Chair rails are available in many preformed shapes, or you can create. I suggest a newbie or anyone out of practice and or making a convoluted cut practice a couple times till the confidence level is up. Outside corners often flare out slightly, so that the chair rail needs to be cut at more than 45 degrees.
Chair rail isn't just for the dining room anymore! Cut a 45 degree angle on the end of the molding that needs the dead end or end cap. Removing the chair rails from the walls. Bevel, miter, or make scarf joints as required using the techniques demonstrated earlier. The general rule is that the chair rail should be about 1/3 of the way up from the floor (between 32 and 36 for an 8' ceiling).
How To Install Chair Rail Molding Diyer S Guide Bob Vila from empire-s3-production.bobvila.com You can cut the angles perfectly each time by trimming down. Even trim allows to sit and acclimate for weeks will still shrink even a little. Swing the miter saw blade to the left side and. Chair rails are available in many preformed shapes, or you can create. Line up the end of the chair rail with the miter box so that you cut it at a 90 degree angle. Removing the chair rails from the walls. When autocomplete results are available use up and down arrows to review and enter to select. Paint the chair rail and the trim.
Watch as the #verycoolguys of construction show you how to install chair rail, in a proper molding installation.today we show you, step by step, how to insta.
Even trim allows to sit and acclimate for weeks will still shrink even a little. The back side of the molding should be shorter than the front. How to cut an end cap for molding like chair rail abbotts at home. Once you have cut one corner end of the rail, cut the corner as well. The 45 degree cut on the return will abut the chair rail, and the 90 degree cut will sit flush with the wall (or in this case, the side of my bookcase. Use a stud finder and mark off where the studs are so you know where to nail in the trim. To determine the height of the chair rail, measure the height of the ceiling and divide it by three. Fit it against the top of the tongue and groove panels and nail directly into the wall studs above the wainscoting. Line up the end of the chair rail with the miter box so that you cut it at a 90 degree angle. Touch device users, explore by touch or with swipe gestures. It's now a great way to add some character to your boring, basic walls. This would allow an easier fitting later on. It should be standing on edge with the profile facing away from the fence.